Monday 18 April 2016

3D Battle Arena, Final post

I have to say I was extremely pleased with the outcome of my battle arena, the cartoon textures worked a charm, and so did the lighting effects that were included.

For effects like rain and fog, I used the particle emitter with a smoke texture for the texture that gets emitted.


Also I added in water and water flowing from the pipe to add to the scene. Sound effects were added too to make it feel like there was rain coming in from the roof. 

The statue also fitted in well, with the textures that were added. Thanks to help with the lighting in the scene I managed to pull off the look I wanted for the arena.
Added to this I also added Alpha textures around the place, such as vines and leafs that were attached to things like pillars.

That being said all the textures in the arena were painted with help of images.


I have to say I was really pleased with the outcome of the arena as a whole, the cartoon look paid off in the end and had a nice outcome.

3D Statue final post

Finally, after all the hard work my statue is done.

The finished statue


That being said though I did run into one problem before putting it into my arena. For some reason the rig I attached and posed earlier in the week didn't stay, so I had to re-rig and pose it again. However this was good experience as I was able to go though rigging again. 

I also made some tweeks to the UV map, now I added cracks and moss to the statue to make it fit into the scene more.

The UV map for the statue.

Also there was a small problem importing it into unity, the pose would not stay and the model stayed in T pose, but thanks to the help of Phill the problem was resolved and I was able to re-import it again.

Final render of the statue in the arena.


In the end I have to say I was quite proud of the statue, as it turned out better than I thought it would. 

Sunday 17 April 2016

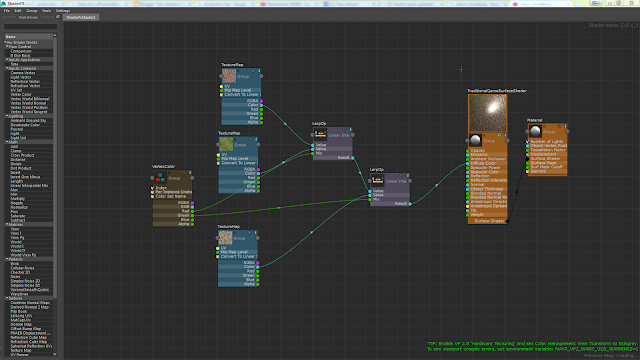
3D, blending textures

In class we were taught how to blend textures using Maya and shader fx.

Below is my shader fx window that had rock, grass and mud assigned to it.


Below is the outcome from using these textures and then painting them.


3D, Mushroom

In class we were tasked with making a mushroom.

Here is my attempt below.


Before


After I made the model following phill's tutorial, I then painted overt the UV's for the mushroom.


Below is the end result.

After

Saturday 16 April 2016

3D statue, part 6

For the final phase of modelling the statue I went about adding details to the body. Originally I was going to do this in Zbrush, but I thought it would be easier if I did it in Maya. The first thing I added was the tri hat to the model, This was actually kind of easy and I managed to make it fairly quickly, and with not that many tris.


As you can see, this is a hat.


This is also the same hat, but from another angle. 

After the hat was added I tried to make the coat and cuff links for the model.


It might be hard to see from the image, but I kind of made indents on the body that made it look like he was wearing a shirt. The cufflinks were actually really easy as all I had to do was extrude the bits near the start of the hands. Buttons were also added to give the shirt some sort of texture.


Looking at the back of the shirt, you can see that there are flaps like on coats worn by red shirts at the time. 

3D statue, part 5

After the hand and face were done, I started work on the main body for the character. The original intention way to do the main body in Maya, and then add details to it in Zbrush. But I ended up doing everything in Maya as I was terrible with Zbrush. In the end stuff like clothes, hats, and small details, were added in Maya. 


Photos of the body before clothes were added.


One of the main problems I had with making the body was trying to attack the head and hands. For instance there would be more verts on the head then there would be on the hand. Never the less with help from Phill I managed to sew everything together.


3D statue, part 3

After working on the face, and being somewhat happy with how it turned out, I began work on the hand.

Take a look at this abomination. 


Look at those fingers, don't they look freeky.
One of the main problems I had with the hands, was the fact that I could never get the fingers right., like look at them, they look like carrots or something.
That being said, I was happy that I managed to get the hand done in the end.

3D Statue, part 2

3D is hard

So after creating the mood board for the statue and the concept mock up, I began work on the face for the statue. Phill gave us some reference images that allowed us to model the head from two sides.


Admittedly I didn't take many photos during the process as I was too busy trying to make a face that didn't look like a store mannequin.


I was sort of happy with how it turned out in the end. It was relatively easy to do as all had to do was model one side of the face and then mirror it for the other side. 

3D Statue, part 1

For our new assignment for 3D we were tasked with designing a statue for our battle arena.

To start off we had to design our character by making a masking sheet. Which basically meant we had to take photos of stuff we wanted on our models, and then photoshop them into a human model.

I knew that for my statue I wanted to make something that had the same  look and aesthetics as the red coats from the colonial era.

For insperation I looked at concept art photos from games such as Empire: Total War, and Handcock from Fallout 4. 


I also added other stuff to the model mask, such as a disfigured face, which I took inspiration from Wolfenstien the new Order.


In the end I combined all the images to make a mock up of what I would want the statue to look like.


Also, here is the mood board for the statue.

Friday 15 April 2016

Battle Area Part 1

One of our first assignments for 3D arts was to make a battle arena in Maya, using references from other games. Before we started on making the arena we were tasked with making a moodboard with various images from different games. This was to help us reference and show off what we wanted to create for our arena.

As it was my first time using 3D software like Maya I wanted to create something simple that would not be too difficult for me. Because of this I decided to make a arena that was similar to one of the arenas in World of Warcraft. Despite the game having a very distinct art style most of the models are low polly, thus being easy to copy as there wasn't much complexion to copy with the models.

I decided to copy Darlaran arena a sewer area that was located under one of the main cities in the game, the area was small yet at the same time interesting to do. 


However, we were not tasked with copying the arena, but making our own with reference. Because of this I set out to copy some parts of the arena, while adding my own twist to those parts.

When I first started working on the arena I set out to make the ground of the level. I first made the floor area look like the square floor that can be found in the moodboard images. With this I needed to add a drain in the middle of the floor. I did this by adding a cylinder to the middle of the base and then cutting with a difference booleans. 

After the main base area was made I then added in pipes on one side of the map to give off the impression that the area might be a sewer. After doing so I decided to add stairs to two sides of the arena to give the player a little more area to explore, and to add more complexity to the level. 


When this was done I decided to add clutter such as boxes and ruins into the middle of the arena to make the area seem less empty and lonely. The middle of the arena also had a ruin added near the drain, this was also done to give off the impression that the area might of been abandoned. 

A ramp was also added to allow the player access to the sewer pipes that over looked the rest of the level. 


Despite adding crates and other clutter to make the level feel less empty I still felt like there wasn't much in the level, and still felt like there was a lot of empty space. To fix this I added a broken walkway that stretched from one end of the map to the other. 

To keep with the theme that the sewer was abandoned and in disrepair I made it look like the walkway was falling apart. Planks were placed on the floor and moved to look like they were falling off of the walkway itself. There was also one section of the walkway that had completely collapsed and had fallen on It's side, scattering planks on the boxes below it.

 On each part of the walkway near the collapsed part I bent the walkway downwards to make it look like the thing ripped the planks off.

As well as all this destruction I also slightly rotated each plank that made up the walkway to make the it seem more life like and more hand made.


Battle Arena 2

Texturing the battle arena was the next logical step. 

For the art style of the arena I decided on doing something a bit different than normal texturing. At the time of deciding apon the art style I was influenced by the ascetics of the Telltale games like the Wolf Among Us, Walking Dead, or Tales of Borderlands games. I was also influenced by games like Borderlands which used the same art style. 

The Wolf Among Us
Because this art style was comic book style, which didn't use realistic textures, most of the textures had to be painted over or drawn over in photoshop. This was actually a very fun process because it allowed me to get creative when working with the textures to try and achieve the comic book like art style. 

Borderlands

When making the textures look cartoon I found out that the best way to make the textures smooth-ish comic book style was to apply a smart blur filter onto them. Simply put, this meant that the textures then became a slight bit burred, and thus looking almost painted. Because of this effect most of the images used in texturing looked almost like something out a Telltale game. 

The next part was to add detail onto the textures so they didn't look bland and empty. Using textures and brushes in photoshop, I added little details to each texture like cracks or dirt. This was to make each object look almost worn or used in a way. 

Well Texture
The last part of making the textures was to add black outlines near the edges of the textures to finish off the intended comic book effect. However with some textures black outlines were not possible as they would negatively effect the texture. This was mainly a problem with foliage or textures that used Alpha channels, as the black outline would make the texture look smaller than expected.

Box Texture
In the end the textures turned out nicely and looked cartoon-ish like I wanted. Some textures were made from scratch while some textures were made with images that were found on various sites on the internet.


Tuesday 12 April 2016

Visual Arts, Whale kid speed painting

For Visual Arts we were tasked with doing a speed painting for an existing drawing of a whale kid. 

Here is the original drawing: 


Below is my attempt at copying the drawing with the time I had in class.


Personal Work, Gladus in flight

For a short while I was heavily into Star Citizen after obtaining a new ship for the game, and seeing how I was starting to get into landscape drawing, I thought it would be cool to make some Star Citizen themed art. 


To start off the drawing I used a screenshot of the ship that I took in game, and then started to add stuff into the background. At first I wanted to add an aurora boreallas onto the planet down below, but instead I decided against it as it would steal too much of the limelight away from the ship itself. 
I ended up adding a city instead, using images of Europe from space found on google, because I thought it would be a great way to play around with the lighting in the photo. In the end I was quite happy with the result to be honest.


Visual Design, Insect drawing

One of our homeworks for Visual Design we had to design and draw an insect character with human features. 


As usual, I started off by drawing a few crude character designs in my sktechbook before starting on the real thing.  

One thing I wanted to make sure I did with the design was to have a nice stylistic twist. At the time I was heavily into the art of Fallout 4, and the aesthetics of the game. One thing that always caught my eye when playing the game was the unique collectible comic books that the player could pick up throughout the game.

Same


Using these comics as inspiration, I set out to make a character that would look like something that would appear on a comic book cover. Seeing as one of my sketches was a character in a vest, I thought it would be funny to make a comic book cover that referenced Die hard.

Instead of showing my process step by step, I thought  it would just be easier to post a gif that showed each stage of the image as it was developed.


As I started out drawing the character I thought  it would  be cool to make him half lobster and half human. But after doing much work on it I realized that he looked too similar to ZoidBerg from Futurma. Because of this I changed him to have features of an ant. In the end I was happy with the outcome seeing as drawing characters was not my best skill. 

Life drawing

Each week we had life drawing sessions which allowed us to hone our skills and improve our drawings using live models. Over time I began to learn skills and abilities that helped me draw human subjects better, as well as the ability to pick out details better.

Below are some drawings that I am very happy with.